Nach einem Upgrade von OpenMediaVault (OMV) auf die aktuelle Version 6.0 funktioniert der Samba/CIFS Login mit SMB1 nicht mehr. Das liegt daran, dass das Sicherheitskonzept von SMB1 seit Jahren veraltet ist und der Server-Default nun die Protokollvariante SMB2 ist.
Clients, die sich noch mit SMB1 verbinden, laufen auf einen Fehler und müssen auf SMB2 umgestellt werden.
In Folder Sync ist dazu ein neuer Account im “Konten”-Tab zu erstellen, der als Account-Typ SMB2 benutzt. Dieser neue Account wird dann in den “Ordnerpaaren” gegen den alten SMB1 Account ausgetauscht. Achtung: dabei wird der “Remote-Ordner” aus der Konfiguration entfernt und muss neu gewählt werden. Vergessliche machen vor der Änderung einen Screenshot vom Konfigurationsfenster. ;-)
Seitdem die Automobilkonzerne and selbstfahrenden Fahrzeugen arbeiten, werden sie immer wieder gefragt, wann diese denn für den Massenmarkt verfügbar werden. Die Antwort: in fünf Jahren! Immer. Jedesmal.
Dann können wir uns jetzt darauf konzentrieren, den nächsten industriellen Quantensprung Zu erleben: Der Roboter als Haushaltshilfe. In …. Moment … fünf Jahren sollte es soweit sein!
BTW: Für alle, denen 5 Jahre zu lang sind, empfehle ich, den Zeitraum greifbarer umzurechnen: in nur 260 Wochen steht der Robby in der Küche und schalt die Kartoffeln!
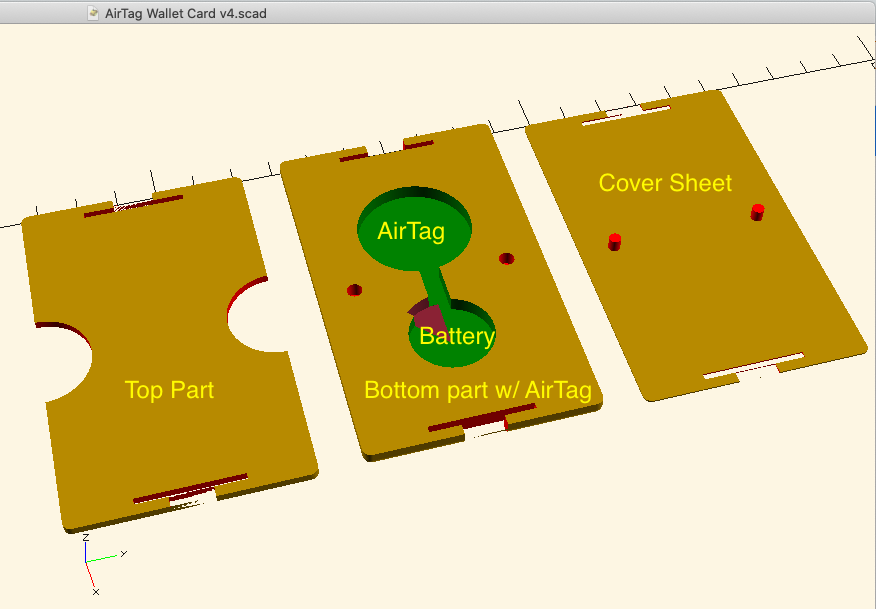
Today I pimped my simple, minimalist card wallet and added a deconstructed AirTag to one of the holder sides.
Due to the desired form factor, I had to rip the AirTag apart, separate the stacked parts and then reattach the electronics to the battery horizontally. This thing is very much just a dirty (albeit working) hack, the 3D files are still work in progress, but you can already download it on Thingiverse or from the Prusa Printers community.
I will add a proper “making of” later. Hit me by email if you need more info
Judging from on the inner layout of the AirTag, I guess it’s just a matter of time until Apple offers a credit card-sized (but thicker) version of the AirTag that goes into your standard wallet comfortably.
The three Stooges
Edit: I changed the name to “Air/Wallet” (with the ‘/’) after realizing the original name may have been copyrighted… ;-)
LuLu by Objective-See is a macOS firewall for outbound connections. While the built-in Apple product will protect you from network attacks from the networks around you, LuLu will give the user control over the network connections a running software on the Mac may want to open itself, e.g. to the Internet. LuLu can act as a freeware replacement for the firewall part in LittleSnitch, the other well-known security tool for the Mac. If you want to know more about LuLu, follow the link above.
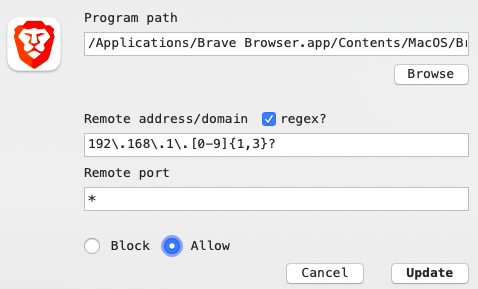
In the “user-guided” mode LuLu will give the choice to create rules for a specific process with:
either a single URL / IP and a sigle port (“Remote Endpoint”)
or all URL’s / IP’s and all ports (“Process”)
… with the choice of allowing or blocking traffic
If you are like me, you might want to tweak those rules. And that’s where the “regex” checkbox comes into play. You can use it, for example, to allow access to all the machines in your home network.
However, the LuLu user documentation currently does a bad job to describe the regex syntax that’s expected by LuLu. Is it 192.168.1.* as the asterisk in the “allow all” suggests? There are many variations of regular expressions, so an example would certainly be appreciated.
LuLu’s regex syntax
LuLu uses Objective-C’s NSExpression class. You can find that documentation here. The most important elements for creating LuLu rules are:
Expression
Description
Example
\
“escape” special characters like * ? + [ ( ) { } ^ $ | \ . / in order to treat them as literals
192\.168\.1\.1
.
placeholder for any character – exactly _one_ character!
192\.168\.1\.... ...\.com
a,b,c,.. A,B,C,.. 0,1,2,..
characters, numbers, symbols are treated as themselves
huf\.org
[pattern]
match any one character from the pattern
[aeiou]
[a-z]
[a-zA-Z]
[0-9]
important regex expressions. See the Apple doc link above for more
In addition to the Expressions above there are modifiers, so you can tell LuLu to expect more than one “any character”. You place the modifier after the expression it applies to:
Modifier
Description
Example
*
Match 0 or more times. Match as many times as possible.
+
Match 1 or more times. Match as many times as possible.
?
Match 0 or 1 times. Prefers 1 times
*?
Match 0 or more times. Match as few times as possible.
+?
Match 0 or more times. Match as few times as possible.
{n}?
Match exactly n times.
{n,}?
Match at least n times, but no more than required for an overall pattern match.
{n,m}?
Match between n and m times. Match as few times as possible, but not less than n.
Important regex modifiers. See the Apple doc link above for more
Some regexamples
Expression
What it means
It Matches…
192\.168\.1\..*
any IP address starting with 192.168.1. regardless what’s in the last octet, or whatever comes after the last dot. Note that there is a \. escaping the last dot and then the .* matching vor any amount of any character after that dot.
192.168.1.1
192.168.1.25
192.168.1.200
192\.168\.1\.[0-9]{1,3}?
This is the safer version of the one above, as it only matches numbers in the last octet.
192.168.1.1
192.168.1.26
192.168.1.230
192\.168\.123\.[0-9]{1,3}?
any IP address starting with 192.168.123. regardless what’s in the last octet.
192.168.1.2
192.168.1.69
192.168.1.100
… more to come
some examples
So, if your home network is 192.168.1.0/24 (e.g. using a netmask of 255.255.255.0), the example below will tell LuLu to allow the Brave Browser to access any machine in your home network (on any port):
What’s next?
I plan to amend this blog post in a while: I think LuLu’s documentation is lacking a good explanation of basic regex and I volunteered to create something on the public Lulu Git.
I will add more examples (like URL regex-es) as I go ahead with that docu.
You can start the Brave Browser on a Mac in incognito mode from the CLI (Terminal) using the “open -a” command:
open -a "Brave Browser" -n --args --incognito --new-window https://huf.org

open -a : opens the Application
-n : Open a new instance of the application even if one is already running
--args : the following arguments go to Brave
--incognito : what do you think?
--new-window : don't reuse an already existing browser window
looking at the manual page with “man open” will help you here.
however grave the problems were that dylan addressed in his song and 1963 album, he certainly didn’t envision how linux distributions like debian are a-changing the way in which we have to configure our network settings. if we look at how we define static ip addresses, we can see quite some dylan-esque transitions. and when you need to persistently define static routes, keeping up-to-date can be at least hard.
it’s been hardly nine months since my post about static routes in debian 9 when that method has been marked as “deprecated” and won’t actually work anymore in debian 10 “buster”. So here’s how to do both static ip and static routes in buster:
the good thing is, it’s now all in one file. just edit /etc/network/interfaces. for the not-so daring types, make a backup before the edit:
so, the other day I needed to add a static route to my raspberry’s route table. the critter is running raspbian 9 (“jessie”). this version of debianesque linux uses dhcpcd for the network configuration.
you can find a whole lot of info on how to configure the box with a static ip address. however, there are few examples for configuring a static routing table entry that will persist after a reboot.
as we all know by now, you can enter a manual route using the command:
# /sbin/route add -net 10.1.2.0/24 gw 10.1.1.100
where 10.1.1.100 is the router on your local network behind which the target network 10.1.2.0 with the netmask 255.255.255.0 (the “/24”) is to be found!
this entry will be lost after a reboot. in order to make it persistent, you have to edit/create a so-called “exit hook”. that’s a file that gets executed by dhcpd at various occasions, e.g. after the network interface has been configured with a valid address.
here’s how to do it:
edit the exit hook file. the command will create it, if it’s not there already:
# sudo vi /etc/dhcpcd.exit-hook
add the routing command, just as you’d type it on the command line (first line is for documentation):
## adding the persistent route from the example above:
/sbin/route add -net 10.1.2.0/24 gw 10.1.1.100
now, in order to activate the hook file, you can try:
# sudo service dhcpcd restart
for a definitive test issue the reboot command.
if something goes wrong, you can debug the dhcpcd hooks by editing the file /lib/dhcpcd/dhcpcd-run-hooks and change the line
: ${syslog_debug:=false}
to
: ${syslog_debug:=true}
you can then “tail /var/syslog” in order to see the debug output.
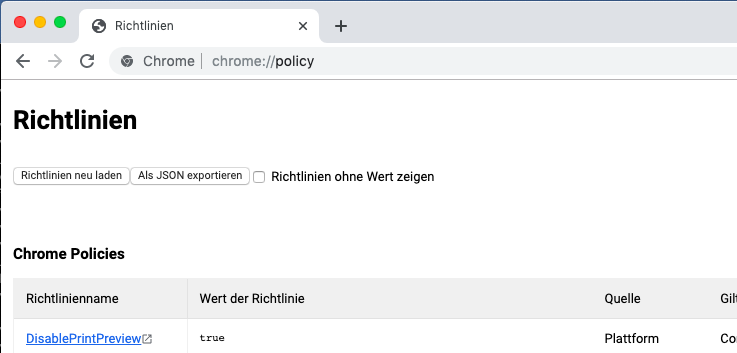
The other day i had this message in my chrome settings: “your browser is managed by your organization”. well, it was actually in german language, so it’s more like this one:
starting with chrome version 73 this warning comes up if one or more of chromes built-in policies differ from the default settings.
so you google the problem and you may find some solutions … for windows! (gasp) — or you come across the ‘solution’ to simply suppress the message without fixing the real problem…
most of us are not part of a browser-managing organization. therefore it would be nice to see which policy elements are set. you can see them with the browser-internal url:
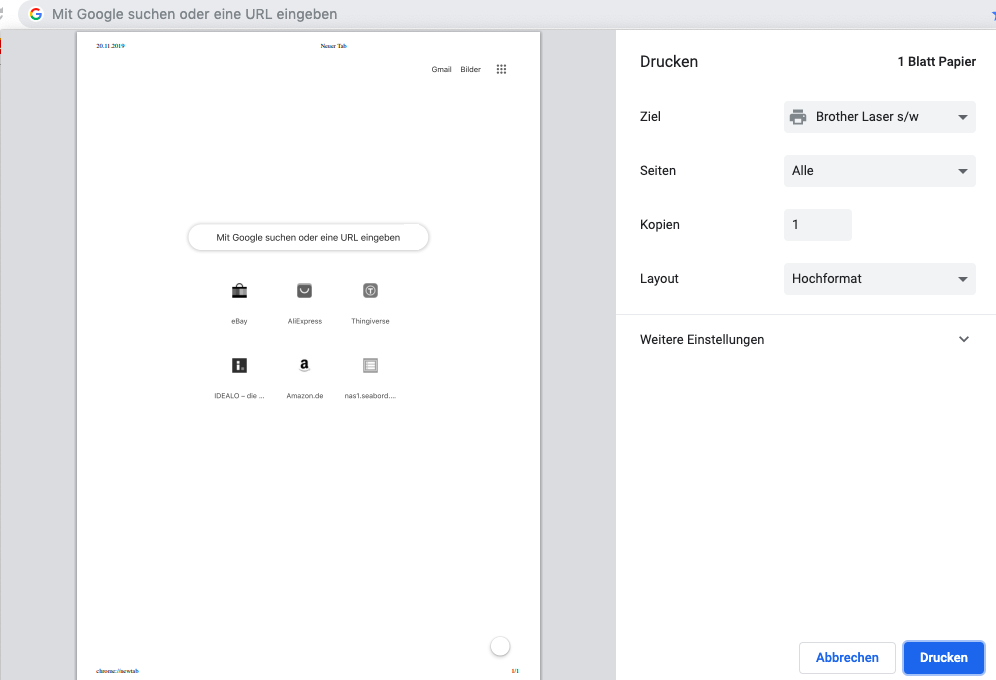
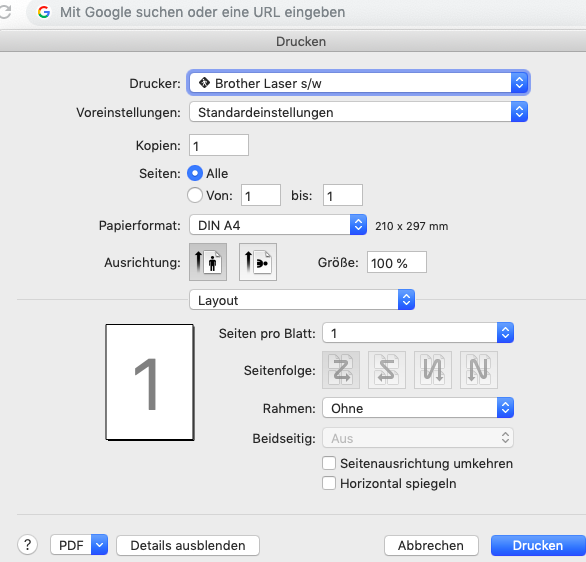
here we go again… wasn’t it months ago when you were fed up with that chrome cloud printing dialog?
cheesy google print dialog…
… apple’s print dialog for real men ;-)
you wanted apples’ standard dialog window with chrome! you wanted back control!! you wanted reven… – whatever!
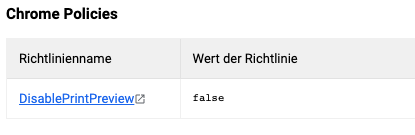
so you updated the policy above (DisablePrintPreview=true) and lived happily ever after since… until now: “your browser is being managed by someone else!” – you want to get rid of that message, for zarquon’s sake!
the thing is, when you set the policy element back to “false”, this still counts as a modified policy.
you can set the propery back with this command in a terminal window and restarting chrome:
et abracadabra: after a chrome restart your browser belongs to you again. no evil corp controlling whatever sleazy (or not) policies are set.
jokes aside: this method is a good way to see if this policy you deleted is actually the reason for the nefarious message. if the message persists after deleting the policy, there’s still another policy active.
I bought a solar lamp at “LIDL” a few days ago. at €9.99 this was a steal. it even includes a pir movement sensor. (see the LIVARNO LUX LED-Solarstrahler)
sadly, the lamp had an integrated low-light switch: the pir mode would only be active when the light shining on the solar panel was low (night). however, I planned to use the light in a fairly dim environment (carport extension). at the same time I wanted to keep the panel outside (sun!). this wold switch the light on at night only (and not in the late afternoon, when I’d need it inside because there may be enough light shining on the panel, outside.
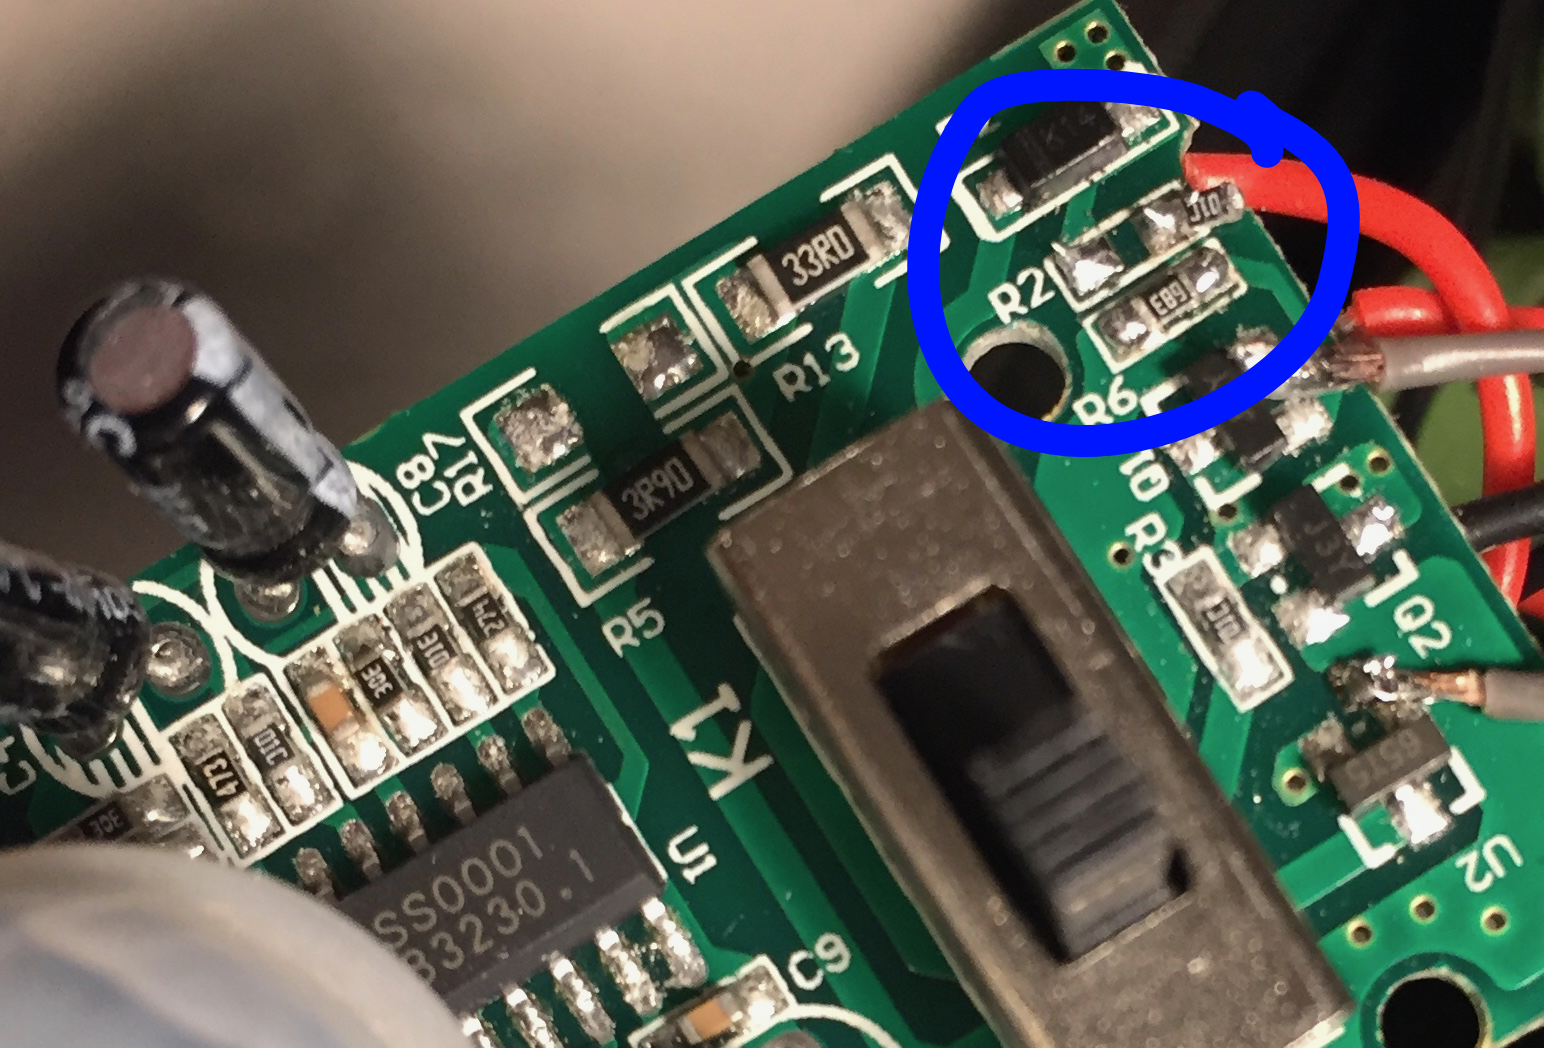
so I opened the enclosure and looked for a way to remove the low-light sensor circuit. spoiler: you can do this by removing one resistor!
the livarno is a beast!
after opening the case, unscrew the circuit board. on the back side you will have to remove resistor R2 as shown in the pix (blue circle):
as you can see, I kinda “parked” the resistor in case I may want to restore the low-light function at a later point in time.
et voilá: solar powered battery led light with a movement sensor and working just the way you’d expect it to.